Basic Airway Adjuncts
Bag-Valve-Mask (BVM):

Indications:
- Assisted ventilation for both adults and pediatric patients.
Technique:
- Create a good seal between mask and the patients face by using one or two person technique Assure the mask is properly sized for the patient's face
Oropharyngeal Airway (OPA) and Nasopharyngeal Airway (NPA)
Indications:
- Assist in maintaining an open airway in patients with inadequate breathing
- OPA is indicated only in patients with no gag reflex
- NPA can be used in patients with an intact gag reflex or clenched jaw
Technique (OPA):
- Choose the correct size OPA by measuring “lip to lobe”.
- In an adult, insert the OPA upside down until resistance is met, then rotate 180 ° and advance until flange is at the lips
- For pediatric patients use a tongue depressor to guide the OPA into position right side up
Technique (NPA):
- Choose the proper size by measuring from nose to lobe
- Lubricate the NPA and insert into the nostril while pushing the tip of the nose up
- Gently advance until the flange rests against the
- Contraindicated if suspected facial fractures or suspected basilar skull fractures (raccoon eyes, battle signs, blood from ear canal)
Complications:
- Regurgitation and aspiration of gastric contents
Bougie (Endotracheal Tube Introducer)
Indication:
The Gum Elastic Bougie is helpful in achieving endotracheal intubation when there is a restricted view of the glottic opening. As we have implemented the new Glidescope Go 2, it is required to use a bougie for every first attempt at intubation. The Bougie is not for "blind" intubation - you should always visualize the tip of the epiglottis, arytenoids, or a partial view of the vocal cords
Technique:
- Once the best possible laryngeal view is obtained, pass the bougie into the patient's mouth and through the glottic opening
- If unable to visualize the vocal cords, advance the bougie anteriorly under the epiglottis and feel for clicks as it slides along the tracheal rings

- While maintaining the best laryngeal view, slide the endotracheal tube over the bougie, and advance it to the desired depth, while maintaining proximal control of the bougie. It is important to leave the laryngoscope in place to view the tube sliding over the bougie. If you do not pre-load the ET tube, this may require two operators. Alternatively, you can preload the bougie into the endotracheal tube, prior to intubation.
- If resistance is encountered while passing the tube, try rotating the bougie and tube 90°.

Complications:
- Esophageal Intubation
- Aspiration of gastric contents
- Bradycardia
- Oral Trauma
- Exacerbation of Spine Injuries
Continuous Positive Airway Pressure (CPAP)
Indications:
- Congestive heart failure/pulmonary edema
- Pulmonary edema secondary to near drowning
- Asthma
- COPD
Contraindications/Precautions:
- Patient less than 8 years of age
- Unable to maintain a patent airway
- Decrease level of consciousness
- Pneumothorax
- Facial Trauma/Burns
- Systolic BP less than 90 mmHg
- Recent surgery to face or mouth
- Epistaxis
- Patient unable to tolerate mask or pressure
- Pneumonia (relative contraindication)
Equipment Needed:
- CPAP Flow generator
- CPAP Mask kit
- Adjustable CPAP/PEEP valve
- Oxygen tank
- Quick connect pigtail
- Cardiac Monitor
- SpO2 Monitor
- ETCO2 Monitor
Procedure:
- Assemble mask kit during morning routine or after last CPAP call. Set CPAP/PEEP valve per appropriate guideline.
- Patient should be in an upright position
- Assure all monitoring devices are attached
- Connect CPAP generator to quick connect pigtail
- Turn on oxygen tank
- Reassure the patient and explain procedure
- Hold the mask on the patients face, gradually creating seal.
- When pt. tolerates mask secure head straps, ensure snug fit.
- Monitor patient condition and vitals every 5 minutes
- Reassess patient breathing effort
- For COPD patients, administer IN-LINE nebulized Albuterol/Atrovent per appropriate guideline.
- If necessary, titrate CPAP/PEEP valve up to 10 cm/H2O if vitals are stable and breathing difficulty has not improved
- If SpO2 does not increase, titrate FiO2 to a SpO2 of at least 90% or administer supplemental oxygen via mask port for non-adjustable CPAP generators.
- Advise receiving hospital that you are transporting a patient that is CPAP “Alert”
Endotracheal Intubation
Indications:
- Respiratory or cardiac arrest
- Decreased mental state, unable to protect airway from vomiting/secretions/bleeding
- Inadequate ventilation with bag valve mask
- Impending respiratory failure or apnea
- Hypoxia unresponsive to 100% oxygen, and any of the following:
- Respiratory rate < 8 breaths per minute
- Poor ventilatory effort (with hypoxia unresponsive to 100% oxygen)
- Inability to maintain patent airway
- Airway obstruction
Equipment:
- Glidescope Go 2 with appropriate size blade
- In case of equipment failure: laryngoscope handle with appropriate size blade.
- Proper size endotracheal tube (ETT) plus back up ETT 0.5 – 1.0 mm smaller
- Water soluble lubrication gel (lubricate distal end of tube at cuff)
- 10-12 ml syringe
- Bougie
- ETT securing device
- Proper size oral pharyngeal airway
- BVM or automatic ventilator
- Oxygen source
- Suction device
- Stethoscope
- Digital capnography and oxygen saturation monitors
Technique:
- The Glidescope Go 2 can be used for direct intubation technique as it has similar anatomic alignment as a MAC blade and the technique for insertion is the same
- Assure all equipment is readily accessible and functioning
- Apply capnography
- Inflate the cuff of the endotracheal tube to check for leaks
- Pre-load ETT onto bougie if desired
- If possible adjust the bed height so that the patient’s ear is level with their sternal notch
- Unless there are contraindications, move the patient into the “sniffing” position by placing a pillow or folded towel under the patient’s occiput

Complications:
- Esophageal Intubation
- Aspiration of gastric contents
- Bradycardia
- Oral Trauma
- Exacerbation of Spine Injuries
Air Traq (available until Jan 2026)
- With your left hand, insert the laryngoscope midline with the blade along the center of the patients tongue and advance slowly until you can visualize the epiglottis
- Pass the tube through the vocal cords until the balloon disappears into the trachea
- Advance the tube until the balloon is 3 to 4 cm beyond the vocal cords
- Typical depth in centimeters is “3 times the tube size” (e.g. 21 cm for a 7mm, 24 cm for an 8 mm tube)
- Inflate the endotracheal balloon with air and assess for proper placement using waveform capnography
- If no alveolar waveform is seen on capnography the tube must be pulled.
- Secondary assessment of placement should include auscultation over the epigastrium and auscultation of both lungs fields for symmetry.
- If an alveolar waveform is present, secure the tube using a commercial tube holder
Glidescope Go 2 (beginning June 2025)
- Technique should be same as traditional intubation
- Device should be programmed for continuous recording
- Still images can be taken during attempted intubation if useful (foreign body, lacerations, etc)
- Please make sure to transfer video clips at the conclusion of each call

ETCO2 Monitoring using Capnography
ETCO2 Monitoring using Capnography Information Sheet(JPG, 112KB)
Elevated End-Tidal Values:
- Hypoventilation - increase rate (not tidal volume) of bagging if this occurs
- Partial airway obstruction- reassess airway and tube if this occurs
- COPD (chronic CO2 “retainers”) or Impending respiratory failure in asthmatics- refer to appropriate protocol
Decreased End-Tidal Values:
- Sepsis
- Cardiac Arrest
- Hyperventilation with bag valve mask
Supraglottic airway insertion (iGel)
Indications:
- Respiratory or other emergencies requiring assisted ventilation
Contraindications:
- Responsive patients with an intact gag reflex
- Patients with known esophageal disease
- Patients who have ingested caustic substances
Equipment:
- Correctly sized airway device (refer to manufacturer’s recommendations)
- Water based lubricant
- Suction device
- Bag-Valve-Mask
- Oxygen
- Endotracheal tube holder
- Capnography and oxygen saturation monitors
- Stethoscope
Technique:
- Select the appropriate size according to the manufacturer’s recommendations (General recommendations below)
- Size 1: under 5 kg
- Size 1.5: 5 to 12 kg
- Size 2: 10 to 25 kg
- Size 2.5: 25 to 35 kg
- Size 3: 30 - 60 kg (up to small adult)
- Size 4: 50 - 90 kg (adult)
- Size 5: > 90 kg (large adult/poor seal with size 4)
- Apply water based lubricant to the back of the mask, careful not to lubricate the anterior surface of the cuff that communicates with the airway
- Pre-oxygenate with BVM
- Position the head in the sniffing position if no cervical spinal injury is suspected
- Use the neutral position if cervical spinal injury is considered
- While holding the iGel with the dominant hand, open the mouth with the non-dominant hand, and apply a chin lift if no cervical spinal injury suspected
- When inserting the mask, hold it like a pen with the index finger placed at the junction of the cuff and tube. Press the tip up against the hard palate and verify it lies flat against the palate and that the tip is not folded over, before pushing further into the pharynx
- Using the index finger, push the mask backwards while maintaining pressure against the palate, to avoid touching the epiglottis. As insertion progresses, the whole index finger should lie along the tube, keeping it firmly in contact with the palate
- When meeting resistance, the finger should be fully inserted into the mouth. Use the other hand to hold the tube while withdrawing the finger from the mouth
- Now, inflate the cuff without holding the tube, as this will allow the tube to move into its optimal position. Inflate the cuff with sufficient air to obtain a low pressure seal.
- Confirm proper placement by assessing capnography waveform and by auscultating lungs sounds.
- If available, place bite-block and secure the device using a commercial tube holder
Complications:
- Regurgitation and aspiration
- Inability to achieve a seal and ventilate
- Obstruction if device becomes dislodged or is incorrectly inserted. The epiglottis may be pushed down with improper insertion
- Localized trauma
- Laryngospasm
Cricothyrotomy
- Surgical cricothyrotomy (adult)
- Percutaneous cricothyrotomy using the Seldinger technique (adult)
- Needle cricothyrotomy with jet ventilation (children < 12 years of age)
Indications:
- Inability to secure an airway using nonsurgical methods
- As a last resort in a “cannot intubate, cannot ventilate” scenario
- Needle cricothyrotomy is the surgical airway of choice for children less than 12 years
Contraindications:
- In true emergencies, there are no absolute contraindications
- Airway obstruction distal to the cricoid membrane
- Inability to identify anatomical landmarks
- Infection at the incision site
Equipment: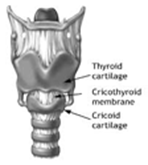
- Cricothyrotomy
- Cuffed endotracheal tubes (5 and 6mm)
- Scalpel, No. 11
- Trousseau dilator (if available)
- Tracheal hook (if available)
- Bougie
- 4 X 4 gauze/sponges
- Percutaneous cricothyrotomy using Seldinger technique (Preferred)
- Commercial cricothyrotomy kit
- Scalpel, No. 11
- 4 X 4 gauze/sponges
- Needle cricothyrotomy
- Over-the-needle catheter, 14 ga, 2 to 5 inches in length
- Syringe, 10 ml
- Scalpel, No. 11
- 4 X 4 gauze/sponges
- Nasal cannula or oxygen tubing with Y-connector
Technique: Cricothyrotomy
- Position the patient supine, with the neck in a neutral position
- Clean the patient’s neck using antiseptic swabs
- Identify the cricothyroid membrane, between the thyroid and cricoid cartilage
- Using the non-dominant hand, stabilize the trachea
- Make a 2-3 cm midline vertical incision through the skin from the caudal end of the thyroid cartilage to the cephalic end of the cricoid cartilage
- Once the membrane is again felt and identified through the first cut, make a 1-2 cm transverse incision through the cricothyroid membrane
- Always ensure you keep the space open after making the 2nd incision. You can do this by, next, inserting either a bougie or hemostat. Rotate the hemostat 90 degrees
- If available, use a tracheal hook to lift the caudal end of the opening to allow passage of a cuffed endotracheal tube directly into the trachea (No. 5 or 6)
- Insert the tube into the trachea with the assistance of a hemostat or over the bougie
- Advance until balloon is within the airway and no longer visible
- Inflate the cuff and confirm placement using Capnography (mandatory) and by assessing chest rise and lung sounds
- Secure the tube
Technique: Percutaneous cricothyrotomy using Seldinger technique (Preferred)
- Use a commercially available kit that has been authorized by the Medical Director
- In addition to manufacturer recommended procedures, follow the first 4 steps of the cricothyrotomy technique
- Direct the needle at a 45° angle caudally while maintaining negative pressure to the syringe. A small, superficial skin incision may allow for easier penetration of the needle
- Once air is aspirated remove the syringe, leaving the needle in place, and pass the guide wire into the trachea
- Insert the dilator/airway tube combination over the guide wire
- Once the airway tube is in place, remove the dilator and guide wire
- Attach to a ventilation device and secure the device
- Confirm placement using capnography (mandatory)
Technique: Needle cricothyrotomy
Surgical procedure used in medical/trauma patients requiring an emergent airway when the patient cannot be oxygenated and ventilated by another secondary device (I-Gel, King LT, ET Tube, LMA, BVM, etc.)
Indicated in patients < 12 years of age.
Equipment: Needle cricothyrotomy
- Decompression needle or 14-gauge needle catheter
- Betadine or other antiseptic
- 3 mm endotracheal tube adapter
- 4x4 gauze
- 10 mL saline syringe
- IV extension set
- Meconium aspirator
- Securing device/tape (pediatric tube holder upside down)
- SPO2 monitor
- ETCO2 monitor
- Cardiac monitor
- Suction
- Oxygen
- BSI
- BVM device
Procedure:
- Determine need for procedure (all other options for oxygenation/ventilation have failed)
- Prepare and gather equipment (check tube, suction on and ready, BSI, oxygen)
- Identify anatomy and landmarks and clean site
- Attach 14-guage catheter to a 10 mL saline syringe containing 5 mL of Normal Saline
- Insert 14-gauge catheter into the cricothyroid membrane towards the patient's feet at 30° - 45° angle
- Aspirate while inserting needle - when air is noted (bubbles), you have entered the trachea
- Advance the catheter (as if inserting an IV) until the hub rests at the skin surface, and remove needle & syringe
- Secure catheter in place (or hold in place by hand)
- Connect the catheter to an IV setup with a 3.0 mm ETT adapter
- Attach the adapter to the meconium aspirator
- Attach suction tubing - to the meconium aspirator at one end, and to the oxygen source at the other
- Flow oxygen at 15L - except if newborn or small toddler, start at 8L and titrate up
- Place finger over hole in the aspirator until chest rise is noted, then release to allow for expiration
- Repeat this at an appropriate respiratory rate
- Control hemorrhage and verify placement (ausculation of lung sounds, SPO2 monitor, ETCO2 monitor)
- Secure tube (pediatric tube holder upside down) and monitor for possible complications
Complications:
- Aspiration
- Hemorrhage
- Unrecognized misplacement
- Thyroid perforation
- Inadequate ventilation/hypoxia
- Esophageal or tracheal laceration
- Mediastinal or subcutaneous emphysema
- Vocal Cord Injury