
Procedures
Airway Procedures
Mucosal Atomizer Device
Hemostatic Dressing
Pleural Decompression
Football Player Spinal Immobilization
Vascular Access
CPR-Pit Crew
12 Lead-EKG
LVAD
Airway Procedures
Basic Airway Adjuncts
Bag-Valve-Mask (BVM):
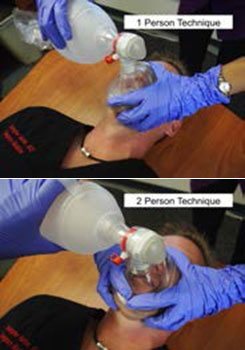
Indications:
- Assisted ventilation for both adults and pediatric patients.
Technique:
- Create a good seal between mask and the patients face by using one or two person technique Assure the mask is properly sized for the patient's face
Oropharyngeal Airway (OPA) and Nasopharyngeal Airway (NPA)
Indications:
- Assist in maintaining an open airway in patients with inadequate breathing
- OPA is indicated only in patients with no gag reflex
- NPA can be used in patients with an intact gag reflex or clenched jaw
Technique (OPA):
- Choose the correct size OPA by measuring “lip to lobe”.
- In an adult, insert the OPA upside down until resistance is met, then rotate 180 ° and advance until flange is at the lips
- For pediatric patients use a tongue depressor to guide the OPA into position right side up
Technique (NPA):
- Choose the proper size by measuring from nose to lobe
- Lubricate the NPA and insert into the nostril while pushing the tip of the nose up
- Gently advance until the flange rests against the
- Contraindicated if suspected facial fractures or suspected basilar skull fractures (raccoon eyes, battle signs, blood from ear canal)
Complications:
- Regurgitation and aspiration of gastric contents
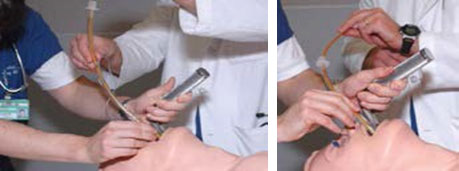
Bougie (Endotracheal Tube Introducer)
Indication:
The Gum Elastic Bougie is helpful in achieving endotracheal intubation when there is a restricted view of the glottic opening. It is not necessary to use on every patient, but it may be useful when a difficult airway is anticipated. The Bougie is not for "blind" intubation - you should always visualize the tip of the epiglottis, arytenoids, or a partial view of the vocal cords
Technique
- Once the best possible laryngeal view is obtained, pass the bougie into the patient's mouth
- and through the glottic opening
- If unable to visualize the vocal cords, advance the bougie anteriorly under the epiglottis and feel for clicks as it slides along the tracheal rings

- While maintaining the best laryngeal view, slide the endotracheal tube over the bougie, and advance it to the desired depth, while maintaining proximal control of the bougie. It is important to leave the laryngoscope in place to view the tube sliding over the bougie. It will require two operators. Alternatively, you can preload the bougie into the endotracheal tube, prior to intubation.
- If resistance is encountered while passing the tube, try rotating the bougie and tube 90°.
Complications
- Esophageal intubation
- Vomiting and aspiration
- Bronchospasm
- Oral Trauma
- Exacerbation spinal injuries
- Laryngospasm
Carevent
Indications:
- Emergency ventilatory support
- Respiratory arrest
- Cardiorespiratory arrest
Contraindications:
- None
Precautions:
- Over / under inflation (tidal volume) if not on correct device setting
- Never attach Carevent directly to an advanced airway. Always use Carevent circuit
Equipment Needed:
- Oxygen bottle and regulator with pigtail or wall mount O2 port
- Carevent circuit
Procedure:
- Assure patency of advanced airway
- Select the tidal volume / frequency of ventilation for the body weight of the patient
- Attach Carevent via circuit and observe patient’s chest rise / fall during ventilation
- Monitor patient frequently for signs of adequate ventilation / oxygenation and reassess often
- ETCO2, SpO2 and EKG should be monitored at all times during use
- Thoroughly clean after each use
|
Automatic Adjustable Settings Selections |
|||||||
|
Control Position |
1 |
2 |
3 |
4 |
5 |
6 |
7 |
|
Tidal volume Vt (ml) |
OFF |
200 |
300 |
400 |
600 |
800 |
1100 |
|
Frequency (BPM) |
OFF |
20 |
15 |
15 |
12 |
12 |
12 |
|
Automatic Flowrate (LPM) |
OFF |
12 |
13.5 |
18 |
21.6 |
28.8 |
39.6 |
|
Body Weight (KG) |
OFF |
13.3-20 |
20-30 |
26.7-40 |
40-60 |
53.3-80 |
73.3-110 |
Continuous Positive Airway Pressure (CPAP)
Indications
- Congestive heart failure / pulmonary edema
- Pulmonary edema secondary to near drowning
- Asthma
- COPD
Contraindications / Precautions:
- Patient less than 8 years of age
- Unable to maintain a patent airway
- Decrease level of consciousness
- Pneumothorax
- Facial Trauma / Burns
- Systolic BP less than 90 mmHg
- Recent surgery to face or mouth
- Epistaxis
- Patient unable to tolerate mask or pressure
- Pneumonia (relative contraindication)
Equipment Needed:
- CPAP Flow generator
- CPAP Mask kit
- Adjustable CPAP / PEEP valve
- Oxygen tank
- Quick connect pigtail
- Cardiac Monitor
- SpO2 Monitor
- ETCO2 Monitor
Procedure:
- Assemble mask kit during morning routine or after last CPAP call. Set CPAP / PEEP valve per appropriate guideline.
- Patient should be in an upright position
- Assure all monitoring devices are attached
- Connect CPAP generator to quick connect pigtail
- Turn on oxygen tank
- Reassure the patient and explain procedure
- Hold the mask on the patients face, gradually creating seal.
- When pt. tolerates mask secure head straps, ensure snug fit.
- Monitor patient condition and vitals every 5 minutes
- Reassess patient breathing effort
- For COPD patients, administer IN-LINE nebulized Albuterol/Atrovent per appropriate guideline.
- If necessary, titrate CPAP / PEEP valve up to 10 cm/H2O if vitals are stable and breathing difficulty has not improved
- If SpO2 does not increase, titrate FiO2 to a SpO2 of at least 90% or administer supplemental oxygen via mask port for non-adjustable CPAP generators.
- Advise receiving hospital that you are transporting a patient that is CPAP “Alert”
Endotracheal Intubation
Indications:
- Respiratory or cardiac arrest
- Inadequate ventilation with bag valve mask
- Impending respiratory failure or apnea
- Hypoxia unresponsive to 100% oxygen, and any of the following:
- Respiratory rate < 8 breaths per minute
- Poor ventilatory effort (with hypoxia unresponsive to 100% oxygen)
- Inability to maintain patent airway
- Airway obstruction
Equipment:
- Laryngoscope handle with appropriate size blade.
- Proper size endotracheal tube (ETT) plus back up ETT 5 – 1.0 mm smaller
- Water soluble lubrication gel, (lubricate distal end of tube at cuff)
- 10-12 ml syringe
- Stylet, (insert into ET tube and do not let stylet extend beyond tip of ET tube)
- ETT securing device
- Proper size oral pharyngeal airway
- BVM or automatic ventilator
- Oxygen source
- Suction device
- Stethoscope
- Digital capnography and oxygen saturation monitors
Technique:
- Assure all equipment is readily accessible and functioning
- Apply capnography
- Inflate the cuff of the endotracheal tube to check for leaks
- With the stylet in place, maintain the tube’s natural curve or reshape into “hockey stick” shape
- If possible adjust the bed height so that the patient’s ear is level with their sternal notch
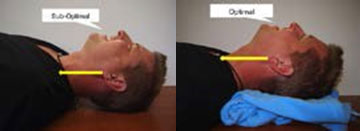
- Unless there are contraindications, move the patient into the “sniffing” position by placing a pillow or folded towel under the patient’s occiput
- Ear should be level with sternal notch
- When intubating an infant, you typically do not need to provide additional head support, because the infant’s large occiput naturally causes the head to assume the sniffing position
- If the clinical situation allows, pre-oxygenate the patient with a non-rebreather mask or high flow O2 with nasal canula for at least 3 minutes prior to intubation. This may obviate the need for bag-valve mask ventilation, thereby reducing risk of aspiration.
- This step may minimize the need for BVM ventilation, thus reducing the risk of aspiration
- While holding the laryngoscope in your left hand, open the patient’s mouth with your right hand
- Insert the laryngoscope blade to the right of the patient’s tongue and gradually move the blade to the center of the mouth, pushing the tongue to the left
- Slowly advance the blade along the tongue and locate the epiglottis
- If using a curved blade, place the blade tip into the vallecula epiglottica
- If using a straight blade, lift epiglottis up with the tip of the blade
- With the tip of the blade in position, lift the laryngoscope upward and forward at a 45 degree angle to expose the vocal cords
- Try to achieve the best possible view of the vocal cords before attempting to pass the endotracheal tube
- To avoid dental injury do not rock the blade against the patient’s teeth as this will do nothing to improve the view
- While maintaining your view of the vocal cords, insert the endotracheal tube into the right side of the patient’s mouth
- The tube should not obstruct your view of the vocal cords during this critical part of the procedure
- Pass the tube through the vocal cords until the balloon disappears into the trachea
- Advance the tube until the balloon is 3 to 4 cm beyond the vocal cords
- Typical depth in centimeters is "3 times the tube size" (e.g. 21cm for a 7mm, 24cm for an 8mm tube)
- Inflate the endotracheal balloon with air and assess for proper placement using capnography
- If no alveolar waveform is seen on capnography the tube must be removed. This includes a waveform that diminishes after a few breaths.
- Secondary assessment of placement should include auscultation over the epigastrium and auscultation of both lungs fields for symmetry
- If an alveolar waveform is present secure the tube using a commercial tube holder
Complications:
- Esophageal Intubation
- Aspiration of gastric contents
- Bradycardia
- Oral Trauma
- Exacerbation of Spine Injuries
Air Traq
- With your left hand, insert the laryngoscope midline with the blade along the center of the patients tongue and advance slowly until you can visualize the epiglottis
- Pass the tube through the vocal cords until the balloon disappears into the trachea
- Advance the tube until the balloon is 3 to 4 cm beyond the vocal cords
- Typical depth in centimeters is “3 times the tube size” (e.g. 21 cm for a 7mm, 24 cm for an 8 mm tube)
- Inflate the endotracheal balloon with air and assess for proper placement using waveform capnography
- If no alveolar waveform is seen on capnography the tube must be pulled.
- Secondary assessment of placement should include auscultation over the epigastrium and auscultation of both lungs fields for symmetry.
- If an alveolar waveform is present, secure the tube using a commercial tube holder
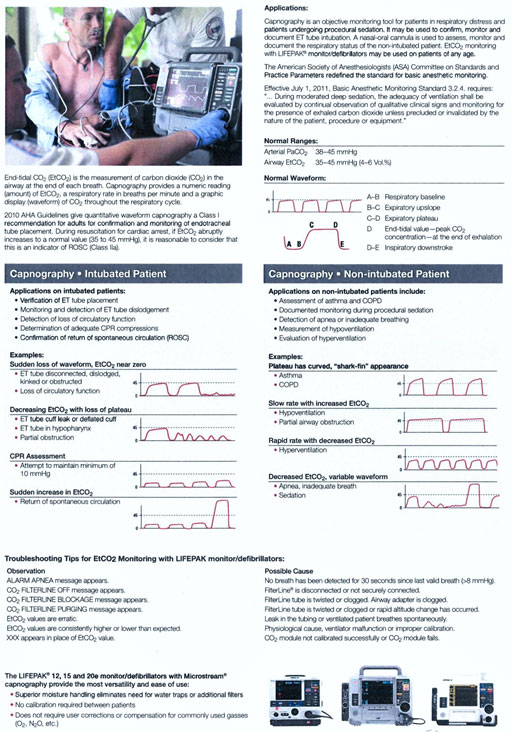
ETCO2 Monitoring using Capnography
Click here for more information.
Elevated End-Tidal Values:
- Hypoventilation- increase rate of bagging if this occurs
- Partial airway obstruction- reassess airway and tube if this occurs
- COPD (chronic CO2 “retainers”) or Impending respiratory failure in asthmatics- refer to appropriate protocol
Decreased End-Tidal Values:
- Sepsis
- Cardiac Arrest
- Hyperventilation with bag valve mask
Laryngeal Tube Airway
Indications:
- Respiratory or other emergencies requiring assisted ventilation
Contraindications:
- Responsive patients with an intact gag reflex
- Patients with known esophageal disease
- Patients who have ingested caustic substances
Equipment:
- Correctly sized airway device (refer to manufacturer’s recommendations)
- Water based lubricant
- Inflation syringe or KLT900 Cuff pressure Gauge
- Suction device
- Bag-Valve-Mask
- Oxygen
- Endotracheal tube holder
- Capnography and oxygen saturation monitors
- Stethoscope
Technique:
- Test cuff by injecting maximum amount of air into the cuff, then deflate for insertion
- Apply water based lubricant to the beveled distal tip and posterior aspect of tube, being careful not to introduce lubricant into the ventilation ports
- Pre-oxygenate with BVM
- Position the head in the sniffing position if no cervical spinal injury is suspected
- Use the neutral position if cervical spinal injury is considered
- While holding the King LT with the dominant hand, open the mouth with the non-dominant hand, and apply a chin lift if no cervical spinal injury suspected
- With the King LT rotated laterally at 45-90 such that the blue orientation line is touching the corner of the mouth, introduce the tip into the mouth and advance behind the base of the tongue
- As the tube tip passes under the tongue, rotate the tube back to midline (blue orientation line faces chin)
- Without using excessive force, advance the King LT until the base of the connector aligns with the teeth or gums
- If using the KLT900 Cuff Pressure Gauge, inflate the cuff to 60cm H2O
- If using a syringe, inflate the cuff with the minimum volume to seal the airway at the peak ventilatory pressure employed
- Attach resuscitation bag and deliver a gentle breath while simultaneously withdrawing the airway device until ventilation is easy.
- Confirm proper placement by assessing capnography waveform and by auscultating lungs sounds.
- Secure the device using a commercial tube holder
Complications:
- Regurgitation and aspiration
- Inadvertent intubation of the trachea
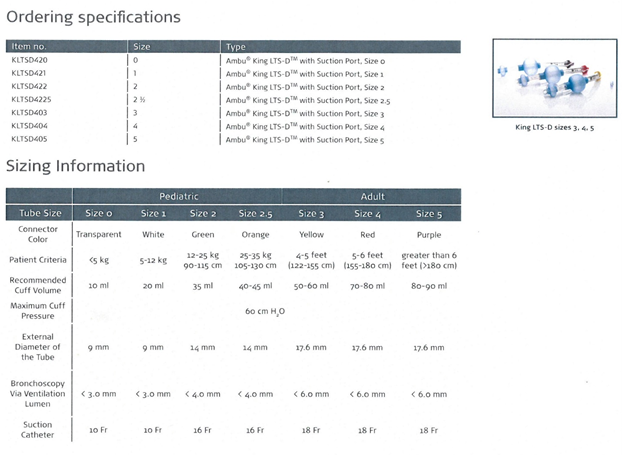
Click here to view ordering and sizing information.
Laryngeal Mask Airway
Indications:
- Respiratory or other emergencies requiring assisted ventilation
Contraindications:
- Responsive patients with an intact gag reflex
- Patients with known esophageal disease
- Patients who have ingested caustic substances
Equipment:
- Correctly sized airway device (refer to manufacturer’s recommendations)
- Water based lubricant
- Inflation syringe
- Suction device
- Bag-Valve-Mask
- Oxygen
- Endotracheal tube holder
- Capnography and oxygen saturation monitors
- Stethoscope
Technique:
- Select the appropriate size according to the manufacturer’s recommendations (General recommendations below)
Size 1: under 5 kg
Size 1.5: 5 to 10 kg
Size 2: 10 to 20 kg
Size 2.5: 20 to 30 kg
Size 3: 30 kg to small adult
Size 4: adult
Size 5: Large adult/poor seal with size 4
- Test cuff by injecting maximum amount of air into the cuff, then deflate for insertion
- Apply water based lubricant to the back of the mask, careful not to lubricate the anterior surface of the cuff that communicates with the airway
- Pre-oxygenate with BVM
- Position the head in the sniffing position if no cervical spinal injury is suspected
- Use the neutral position if cervical spinal injury is considered
- While holding the LMA with the dominant hand, open the mouth with the non-dominant hand, and apply a chin lift if no cervical spinal injury suspected
- When inserting the mask, hold it like a pen with the index finger placed at the junction of the cuff and tube. Press the tip up against the hard palate and verify it lies flat against the palate and that the tip is not folded over, before pushing further into the pharynx
- Using the index finger, push the mask backwards while maintaining pressure against the palate, to avoid touching the epiglottis. As insertion progresses, the whole index finger should lie along the tube, keeping it firmly in contact with the palate
- When meeting resistance, the finger should be fully inserted into the mouth. Use the other hand to hold the tube while withdrawing the finger from the mouth
- Now, inflate the cuff without holding the tube, as this will allow the tube to move into its optimal position. Inflate the cuff with sufficient air to obtain a low pressure seal.
- Confirm proper placement by assessing capnography waveform and by auscultating lungs sounds.
- If available, place bite-block and secure the device using a commercial tube holder
Complications:
- Regurgitation and aspiration
- Inability to achieve a seal and ventilate
- Obstruction if device becomes dislodged or is incorrectly inserted. The epiglottis may be pushed down with improper insertion
- Localized trauma
- Laryngospasm
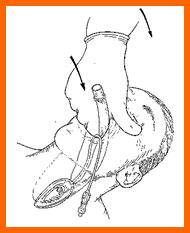
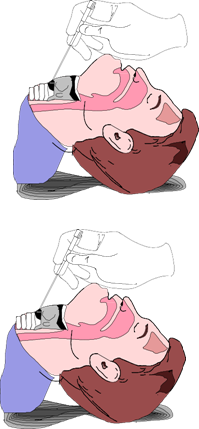
Surgical cricothyrotomy (adult)
Percutaneous cricothyrotomy using the Seldinger technique (adult)
Needle cricothyrotomy with jet ventilation (children < 12 years of age)
Indications:
- Inability to secure an airway using nonsurgical methods
- As a last resort in a “cannot intubate, cannot ventilate” scenario
- Needle cricothyrotomy is the surgical airway of choice for children less than 12 years
Contraindications:
- In true emergencies, there are no absolute contraindications
- Airway obstruction distal to the cricoid membrane
- Inability to identify anatomical landmarks
- Infection at the incision site
Equipment:
- Cricothyrotomy
- Cuffed endotracheal tubes (5 and 6mm)
- Scalpel, No. 11
- Trousseau dilator (if available)
- Tracheal hook (if available)
- Bougie
- 4 X 4 gauze/sponges
- Percutaneous cricothyrotomy using Seldinger technique
- Commercial cricothyrotomy kit
- Scalpel, No. 11
- 4 X 4 gauze/sponges
- Needle cricothyrotomy
- Over-the-needle catheter, 14 ga, 2 to 5 inches in length
- Syringe, 10 ml
- Scalpel, No. 11
- 4 X 4 gauze/sponges
- Nasal cannula or oxygen tubing with Y-connector
Technique: Cricothyrotomy
- Position the patient supine, with the neck in a neutral position
 Clean the patient’s neck using antiseptic swabs
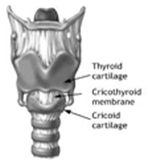
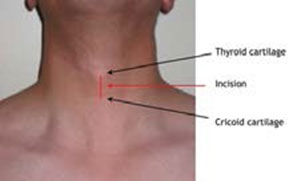
- Identify the cricothyroid membrane, between the thyroid and cricoid cartilage
- Using the non-dominant hand, stabilize the trachea
- Make a 2-3 cm midline vertical incision through the skin from the caudal end of the thyroid cartilage to the cephalic end of the cricoid cartilage
- Once the membrane is again felt and identified through the first cut, make a 1-2 cm transverse incision through the cricothyroid membrane
- Always ensure you keep the space open after making the 2nd incision. You can do this by, next, inserting either a bougie or hemostat. Rotate the hemostat 90 degrees
- If available, use a tracheal hook to lift the caudal end of the opening to allow passage of a cuffed endotracheal tube directly into the trachea (No. 5 or 6)
- Insert the tube into the trachea with the assistance of a hemostat or over the bougie
- Advance until balloon is within the airway and no longer visible
- Inflate the cuff and confirm placement using Capnography (mandatory) and by assessing chest rise and lung sounds
- Secure the tube
Technique: Percutaneous cricothyrotomy using Seldinger technique
- Use a commercially available kit that has been authorized by the Medical Director
 In addition to manufacturer recommended procedures, follow the first 4 steps of the cricothyrotomy technique
- Direct the needle at a 45° angle caudally while maintaining negative pressure to the syringe. A small, superficial skin incision may allow for easier penetration of the needle
- Once air is aspirated remove the syringe, leaving the needle in place, and pass the guide wire into the trachea
- Insert the dilator/airway tube combination over the guide wire
- Once the airway tube is in place, remove the dilator and guide wire
- Attach to a ventilation device and secure the device
- Confirm placement using capnography (mandatory)
Technique: Needle cricothyrotomy
Surgical procedure used in medical / trauma patients requiring an emergent airway when the patient cannot be oxygenated and ventilated by another secondary device (I-Gel, King LT, ET Tube, LMA, BVM, etc.)
Indicated in patients < 12 years of age.
Needle cricothyrotomy equipment:
- decompression needle or 14-gauge needle catheter
- Betadine or other antiseptic
- 3 mm endotracheal tube adapter
- 4x4 gauze
- 10 mL saline syringe
- IV extension set
- Meconium aspirator
- Securing device / tape (pediatric tube holder upside down)
- SPO2 monitor
- ETCO2 monitor
- Cardiac monitor
- Suction
- Oxygen
- BSI
- BVM device
Procedure:
- Determine need for procedure (all other options for oxygenation / ventilation have failed)
- Prepare and gather equipment (check tube, suction on and ready, BSI, oxygen)
- Identify anatomy and landmarks and clean site
- Attach 14-guage catheter to a 10 mL saline syringe containing 5 mL of Normal Saline
- Insert 14-gauge catheter into the cricothyroid membrane towards the patient's feet at 30° - 45° angle
- Aspirate while inserting needle - when air is noted (bubbles), you have entered the trachea
- Advance the catheter (as if inserting an IV) until the hub rests at the skin surface, and remove needle & syringe
- Secure catheter in place (or hold in place by hand)
- Connect the catheter to an IV setup with a 3.0 mm ETT adapter
- Attach the adapter to the meconium aspirator
- Attach suction tubing - to the meconium aspirator at one end, and to the oxygen source at the other
- Flow oxygen at 15L - except if newborn or small toddler, start at 8L and titate up
- Place finger over hole in the aspirator until chese rise is noted, then release to allow for expiration
- Repeat this at an appropriate respiratory rate
- Control hemorrhage and verify placement (ausculation of lung sounds, SPO2 monitor, ETCO2 monitor)
- Secure tube (pediatric tube holder upside down) and monitor for possible complications
Complications:
- Aspiration
- Hemorrhage
- Unrecognized misplacement
- Thyroid perforation
- Inadequate ventilation/hypoxia
- Esophageal or tracheal laceration
- Mediastinal or subcutaneous emphysema
- Vocal Cord Injury
Medication Administration
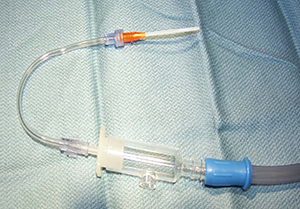
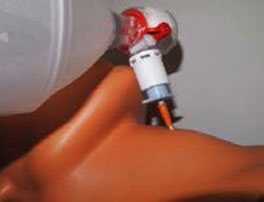
Mucosal Atomization Device (MAD)
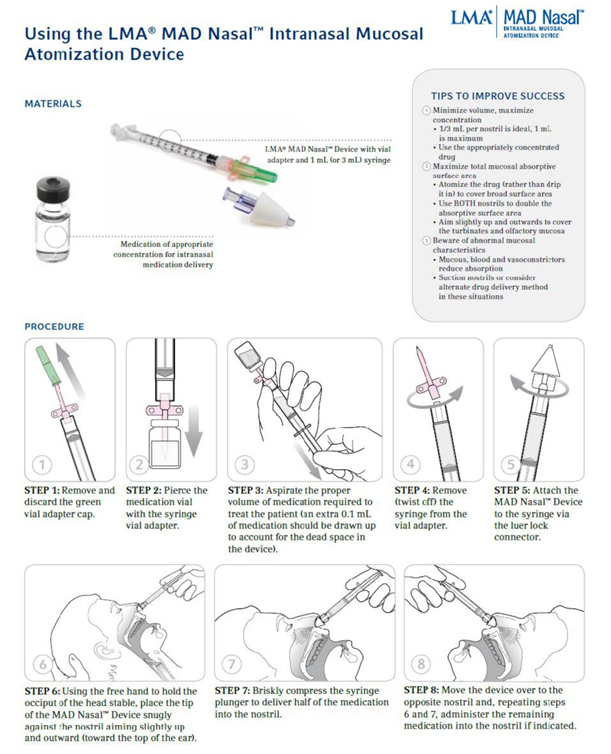
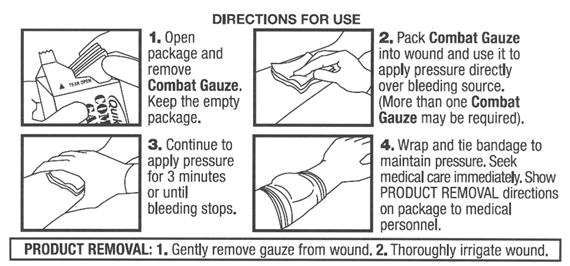
Hemostatic Dressing
Emergency Bandage (known as the “Israeli Bandage”)
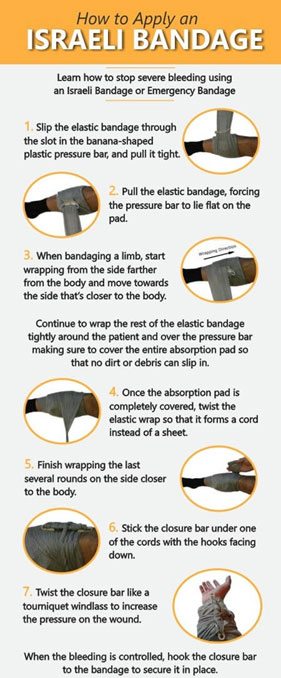
Hemostatic Dressing
Pleural Decompression for Suspected Tension Pneumothorax
Indications:
- Suspected Tension Pneumothorax in patients exhibiting any of the following criteria and the likelihood of tension pneumothorax exists:
- Severe respiratory distress with hypoxia
- Unilateral decreased or absent lung sounds
- Evidence of hemodynamic compromise (Shock, hypotension, tachycardia, altered mental status)
- Tracheal deviation away from the collapsed lung field (less reliable than the above)
- Cardiac Arrest after blunt or penetrating trauma involving the chest or abdomen
- Unless the injury is clearly unilateral, consider bilateral pleural decompression in patients who suffer cardiac arrest in this scenario
Equipment:
- 14 gauge 2 - 5 inch catheter over the needle
- Tape
- Sterile gauze pads
- Antiseptic swabs
- Occlusive dressing
Technique:
- Locate decompression site
- Identify the 2nd intercostal space in the mid-clavicular line on the same side as the suspected tension pneumothorax
- Prepare the site with an antiseptic swab
- Firmly introduce catheter immediately above 3rd rib in the mid-clavicular line
- Insert the catheter into the thorax until air exits
- Advance catheter and remove needle
- Secure the catheter taking care not to allow it to kink
- Reassess lung sounds and patient condition
- Assess breath sounds and respiratory status
Spinal Immobilization for Football Players
EMS providers must use extreme caution when evaluating and treating an injured football player, especially when the extent of the injury remains unknown. Suspect spinal injury in any football player who has altered mental status or any other neurologic complaint. If the football player isn't breathing work quickly and effectively with the athletic trainer staff to remove the face mask and administer care. In most situations, the helmet and shoulder pads should not be removed in the field. Manage head and neck injuries with the helmet and shoulder pads in place, removing only the face mask from the helmet.
Football Face Mask Removal:
- The face mask should be removed prior to transportation, regardless of current respiratory status
- Those involved in the prehospital care of injured football players must have the tools for face mask removal readily available
Indications for Football Helmet Removal:
- The athletic helmet and chin strap should only be removed if:
- The helmet and chin strap do not hold the head securely, such that immobilization of the helmet does not also immobilize the head
- The design of the helmet and chin strap is such that even after removal of the face mask the airway cannot be controlled, or ventilation be provided
- The face mask cannot be removed after a reasonable period of time
- The helmet prevents immobilization for transportation in an appropriate position
Helmet Removal Technique:
- If it becomes absolutely necessary, spinal immobilization must be maintained while removing the helmet
- Due to the varying types of helmets encountered, the helmet should be removed with close oversight by the team athletic trainers and/or sports medicine staff
- In most circumstances, it may be helpful to remove cheek padding and/or deflate air padding prior to helmet removal
- Appropriate spinal alignment must be maintained during care and transport using backboard, straps, tape, head-blocks or other necessary
- Be aware that the helmet and shoulder pads elevate an athlete's trunk when in the supine
- The front of the shoulder pads can be opened to allow access for CPR and defibrillation
Vascular Access Procedures
Push Dose Epinephrine
1 mL IVP of 1:100,000 (0.01 mg) every minute, titrate to a Systolic BP of 90 mmHg
How to prepare 1:100,000 Epinephrine from 1:10,000 Epinephrine
- Using a 3-way stopcock
- Connect Epi 1:10,000 prefilled syringe
- Connect Normal Saline 10 mL flush
- Select the Epinephrine on the 3-way stopcock by facing OFF towards NS flush
- Waste 9 mL (0.9 mg) of 1:10,000 Epinephrine prefilled syringe into a container
- Select mixing by facing OFF towards the Male Luer-lock
- Expel 9 mL Normal Saline into Epinephrine prefilled syringe and mix solution
Concentration yield is 0.01 mg/mL (1:100,000)
10 mL max of 1:100,000 (0.1 mg) in preparation for intubation
Intraosseous Access using the EZ-IO®
Indications:
- When vascular access is essential in the management of a severely ill adult or child and no other option is readily available
- Cardiac Arrest
- Patients where rapid peripheral IV access is unavailable after two attempts under any of the following conditions:
- Multisystem trauma with hypovolemia
- Significantly burned patient with no IV access
- Severe dehydration with acute altered mental status and hypotension
- Respiratory failure
- Respiratory arrest
- Peri-arrest
-
IO access will not be utilized for prophylactic care
-
The humerus is the preferred site of insertion
Contraindications:
- Child < 1 year of age (pediatric IO needle to be inserted manually in child < 1 year of age)
- The only absolute contraindication is fracture of the tibia, humerus or long bones sites for potential intraosseous access
- Previous insertion within 24 hours
- Infection over the insertion site (should be avoided but not strictly contraindicated)
- Relatively contraindicated if other adequate vascular access is readily available
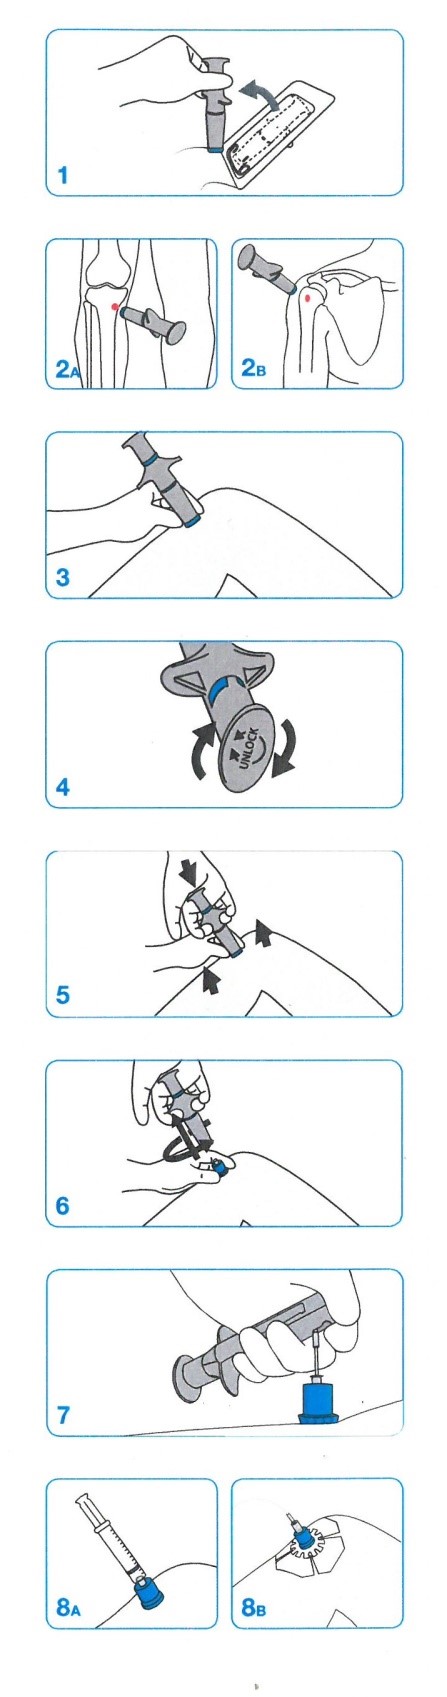
Technique: Tibial Insertion
- Identify and palpate the tibial tuberosity just below the knee
- Locate a consistent flat area of bone 2 cm distal and slightly medial to the tibial tuberosity
- Support the flexed knee by placing a hand or towel under the calf
- Cleanse the area with a sterilizing solution and perform insertion using aseptic technique
- Using the EZ-IO® drill insertion device, gently pierce skin until the needle touches bone. Ensure at least one black line is visible on the needle (if not, select larger needle size)
- Squeeze the trigger while maintaining gentle, steady pressure on the handle
- Release the trigger when you feel a decrease in resistance (hub may be flush with skin)
- If properly placed, the needle should stand up from the bone without assistance
- Remove the inner trocar and use a syringe to aspirate bone marrow
- Obtaining marrow confirms placement
- If marrow does not return when aspirated, flush with 5-10 ml of Normal Saline if unconscious or Lidocaine if conscious.
- For conscious patients, slowly infuse Lidocaine 1mg/kg (up to 40mg) IO over 120 seconds. Allow Lidocaine to dwell in IO space for 60 seconds. Flush with 5-10mL of Normal Saline. An additional dose of Lidocaine 0.5mg/kg (up to 20mg) over 60 seconds can be given as needed.
- Significant resistance or extravasation suggests improper placement
- If flow is good, and no extravasation is seen, attach IV tubing and secure in place
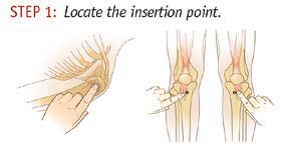
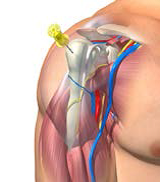
Technique: Humeral Head Insertion
- This site is only to be used on adult cardiac arrest patients and patients who meet the following criteria:
- Multi-system trauma with severe hypovolemia and/or a significantly burned patient with no IV access
- Severe dehydration with vascular collapse and/or loss of consciousness
- Respiratory Failure/Respiratory arrest with no IV access
- Any other immediately life-threatening, peri-arrest clinical condition in which IV access is unobtainable.
- (Under no circumstances should it be used for prophylactic care)
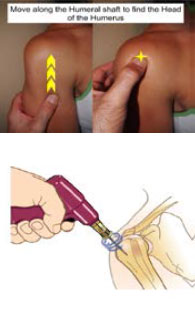
- The humerus is most easily palpated at the insertion point for the deltoid muscle, between the bicep and tricep muscles
- This point is approximately mid-way along the length of the arm
- Palpation of the bone requires firm pressure due to overlying structures
- The surgical neck can be located by palpating up the length of the humerus until you feel a "notch" or "groove"
- The appropriate insertion site is approximately 1cm above the surgical neck for most adults
- Place the patient’s hand over their abdomen (elbow adducted and humerus internally rotated)
- Cleanse the area with a sterilizing solution and perform insertion using aseptic technique
- Using the EZ-IO® drill insertion device, place the needle tip at the selected insertion site, keeping the needle perpendicular to the skin
- Push the needle through the skin and make contact with the bone (ensure at least one black line is visible)
- When ready press the trigger while maintaining gentle steady pressure on the handle
- Once the needle hub has contacted the shin release the trigger
- If properly placed, the needle should stand up from the bone without assistance
- Remove the inner trocar and use a syringe to aspirate bone marrow
- Obtaining marrow confirms placement
- If marrow does not return when aspirated, flush with 5-10 ml of Normal Saline if unconscious or Lidocaine if conscious.
- For conscious patients, slowly infuse Lidocaine 1mg/kg (up to 40mg) IO over 120 seconds. Allow Lidocaine to dwell in IO space for 60 seconds. Flush with 5-10mL of Normal Saline. An additional dose of Lidocaine 0.5mg/kg (up to 20mg) over 60 seconds can be given as needed.
- Significant resistance or extravasation suggests improper placement
 If flow is good, and no extravasation is seen, attach IV tubing and secure in place
- Immobilize the arm to prevent dislodgement
Complications:
- Extravasation of fluid or caustic medications
- Pain, fracture, hematoma, growth plate injury
- Compartment syndrome
- Osteomyelitis
- Cellulitis at the insertion site
Intraosseous Access using the NIO®
Indications:
- When vascular access is essential in the management of a severely ill adult or child (> 3 years of age) and no other option is readily available
Contraindications:
- The only absolute contraindication is fracture of the tibia or long bones sites for potential intraosseous access
- Infection over the insertion site (should be avoided but not strictly contraindicated)
- Abnormalities of bone strength (e.g. osteogenesis imperfecta, osteopetrosis, osteoporosis)
- Osgood-Schlatter disease
- Inability to locate anatomical landmarks or excessive tissue
Technique:
- Primary site for intraosseous injection: Humeral Head** Preferred site**
- Adduct the patient’s hand and locate the greater tubercle next to the head of the humerusTo prevent accidental removal of the device, following the procedure immobilize the patients arm
- Secondary site for the Intraosseous injection: Proximal tibia
- Approximately 1 inch or 2 cm medially and ½ inch or 1 cm proximally to the tibial tuberosity
- Recommended penetration depth for either site is 2.5 cm
- Follow the below technique for either site
- Disinfect the skin on the injection site
- This is a two handed procedure
- Place your non-dominant hand on the textured dots located on the lower part of the NIO and position the NIO at a 90 degree angle to the skin at the injection site
- The non-dominant hand should maintain this position throughout this procedure
- Unlock the NIO by rotating the cap 90 degrees in either direction
- Place the palm of your dominant hand over the cap
- Press the device against the patient’s skin and maintain downward pressure
- While pressing down on the device, pull the trigger wings upwards
- This action will activate the device
- Gently pull the NIO up in a rotary motion while holding the base of the needle stabilizer against the insertion site
- While holding the needle stabilizer and cannula in place, remove the stylet by pulling it up (use a twisting motion of the stylet if necessary).
- The keyhole notch on the distal end of the NIO can be used to assist in removing the stylet from the cannula
- Place stylet into an appropriate biohazard container
- Connect a syringe and confirm secure fitting
- If desired, aspirate bone marrow
- Always confirm successful needle placement by flushing with up to 20 cc of fluid
- Utilize the NIO Fixation sticker to affix the NIO stabilizer
- Connect IV tubing for infusion
- Utilize a pressure infuser or BP cuff if issues with flow
- Cover the insertion site with a sterile, occlusive dressing
- Frequently monitor the limb after beginning drug administration
- Place your non-dominant hand on the textured dots located on the lower part of the NIO and position the NIO at a 90 degree angle to the skin at the injection site
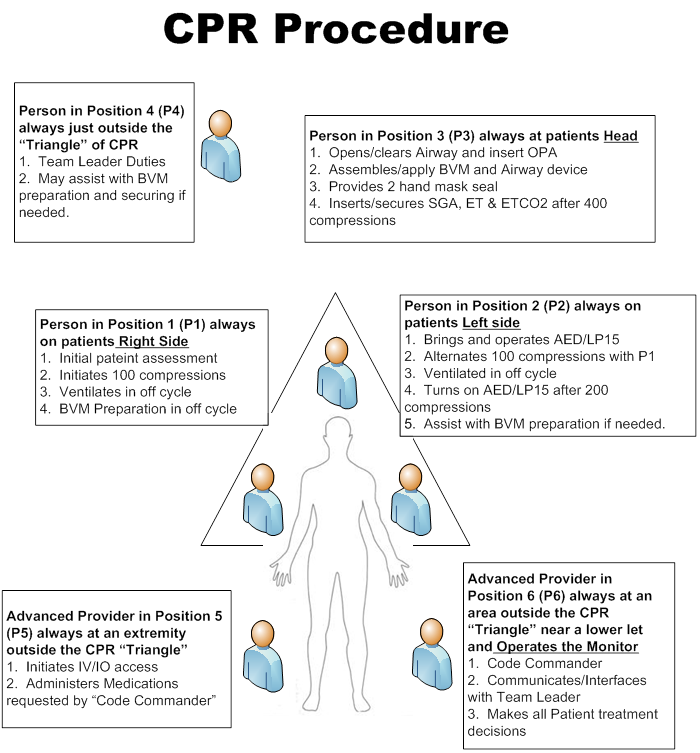
CPR-Pit Crew Approach
Click here for a visual representation of the CPR Procedure.
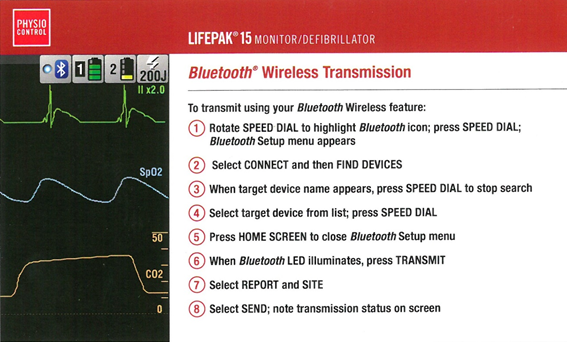
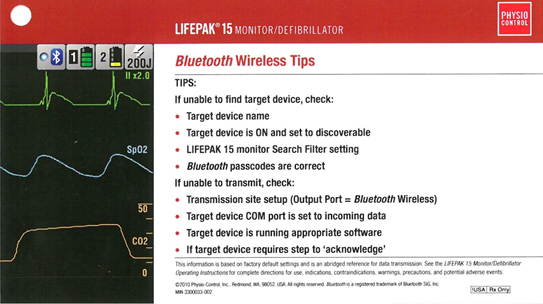
EKG Bluetooth Transmission
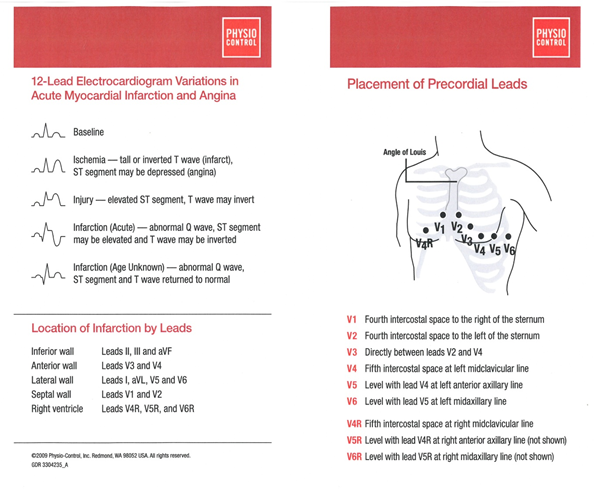
12 Lead EKG
Ventricular Assist Device (VAD)
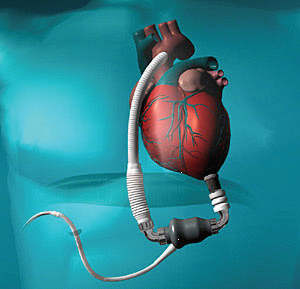
What is a Ventricular Assist Device (VAD)?
A ventricular assist device (VAD) is a mechanical pump that’s used to support heart function and blood flow in people who have weakened hearts.
How does a VAD work?
The device takes blood from a lower chamber of the heart and helps pump it to the body and vital organs, just as a healthy heart would.
What are the parts of a VAD?
The basic parts of a VAD include: a small tube that carries blood out of your heart into a pump; another tube that carries blood from the pump to your blood vessels, which deliver the blood to your body; and a power source.
What is the power source?
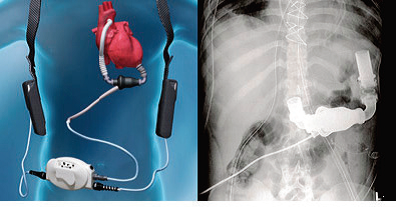
The power source is either batteries or AC power. The power source is connected to a control unit that monitors the VAD’s functions. The batteries are carried in a case usually located in a holster in a vest wrapped around the patient’s shoulders.
What does the control unit or controller do?
The control unit gives warnings, or alarms, if the power is low or if it senses that the device isn’t working right. It is a computer.
Click here to view the VAD color-coding system.
Patient Management For VADs
- Assess the patient’s airway and intervene per your protocol.
- Auscultate Heart Sounds to determine if the device is functioning and also to determine the type. If it is continuous flow device, you should hear a “whirling sound”.
- Assess the device for any alarms.
- Look on controller usually found around the waist of the patient to see what color tag and device it is.
- Match the color on the device tag to the EMS Guide.
- Intervene appropriately based on the type of alarm, tag (device) and EMS Guide.
- Start Large Bore IV.
- Assess vital signs – Use Mean BP with Doppler – the first sound you hear is the Mean Arterial Pressure (MAP).
- If no Doppler, use the Mean on the non-invasive blood pressure machine.
- Transport to closest VAD center. Call the number on the device to get advice.
- Bring all of the patients’ equipment.
- Bring the significant other if possible to act as an expert on the device If patient is unconscious.
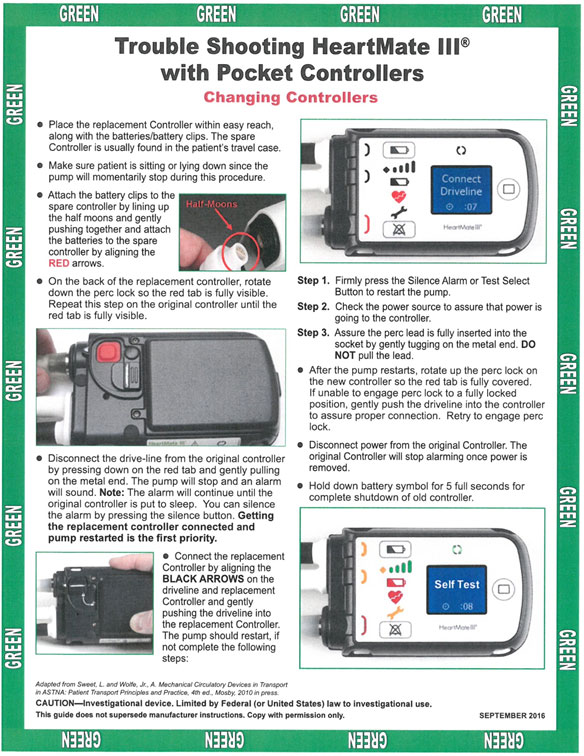
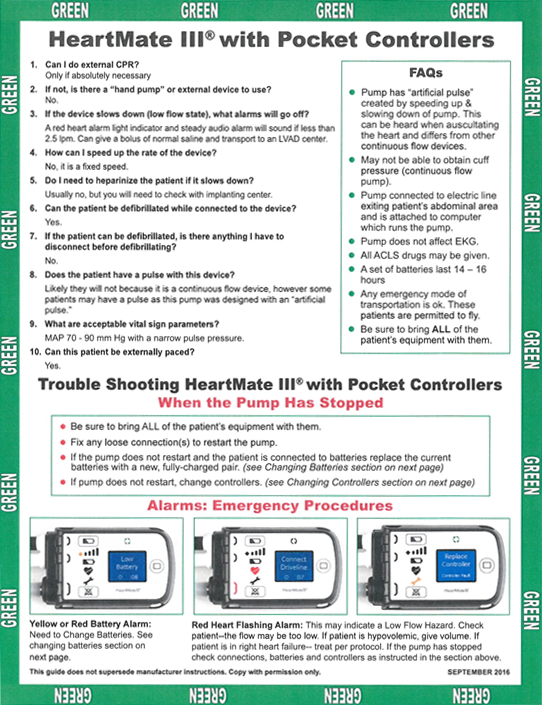
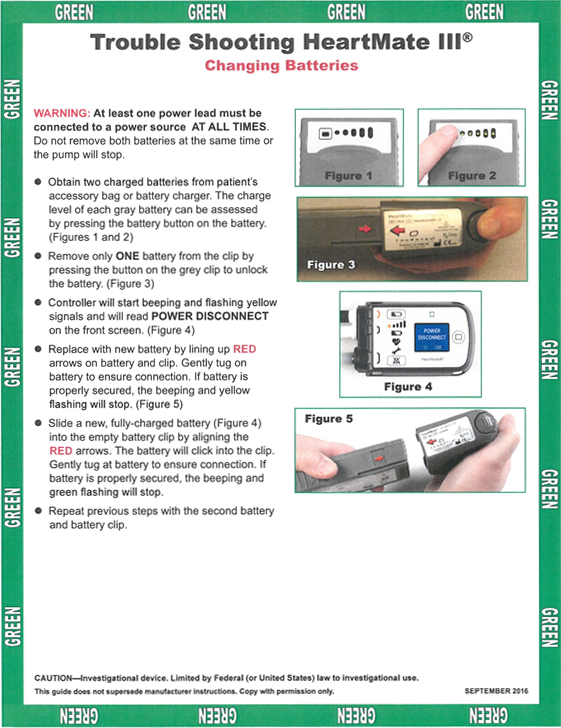
HeartMate III with Pocket Controllers
- Troubleshooting - Changing Controllers
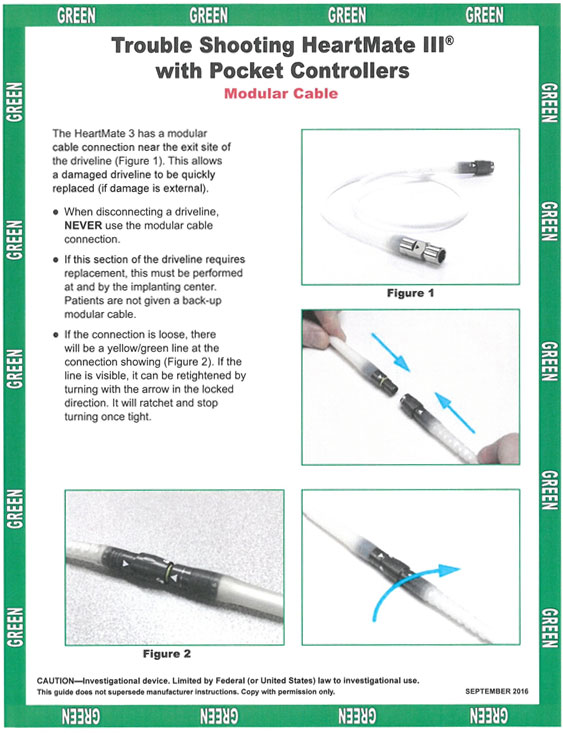
- Troubleshooting - Modular Cable
- FAQ's and Troubleshooting - When the Pump Has Stopped and Alarms: Emergency Procedures for HeartMate III with Pocket Controllers
HeartMate III
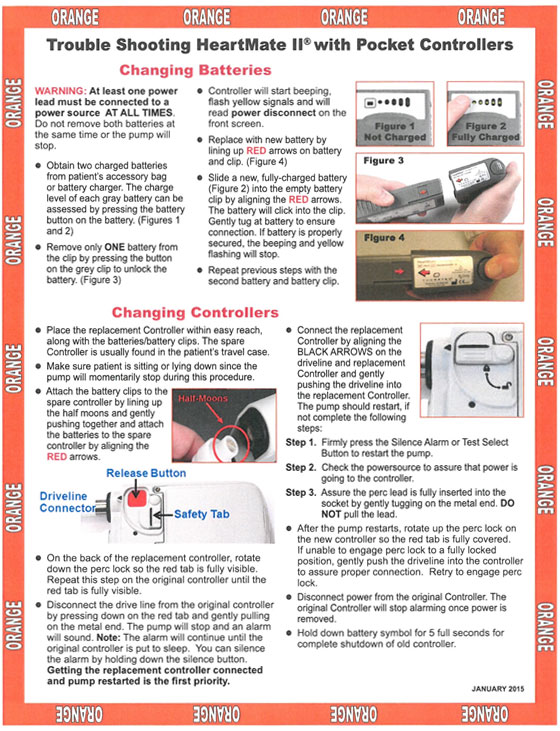
HeartMate II with Pocket Controllers
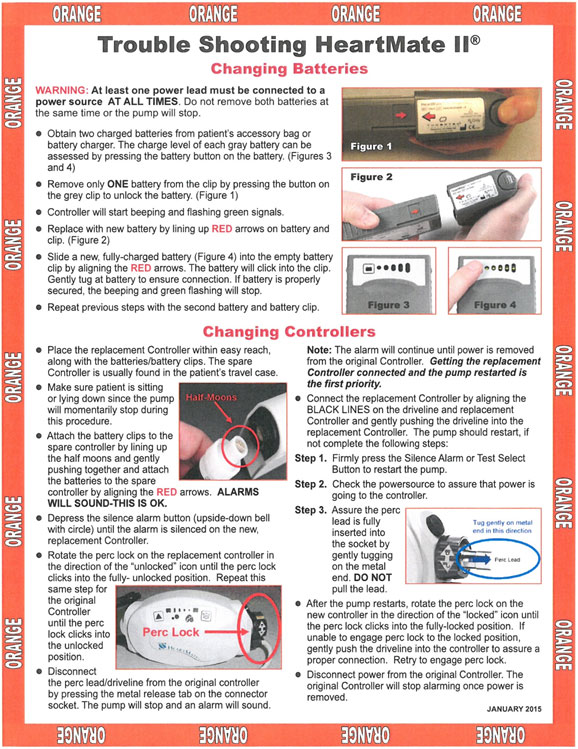
- Troubleshooting - Changing Batteries and Controllers
- FAQs and Troubleshooting - When the Pump Has Stopped and Alarms: Emergency Procedures for HeartMate II with Pocket Controllers
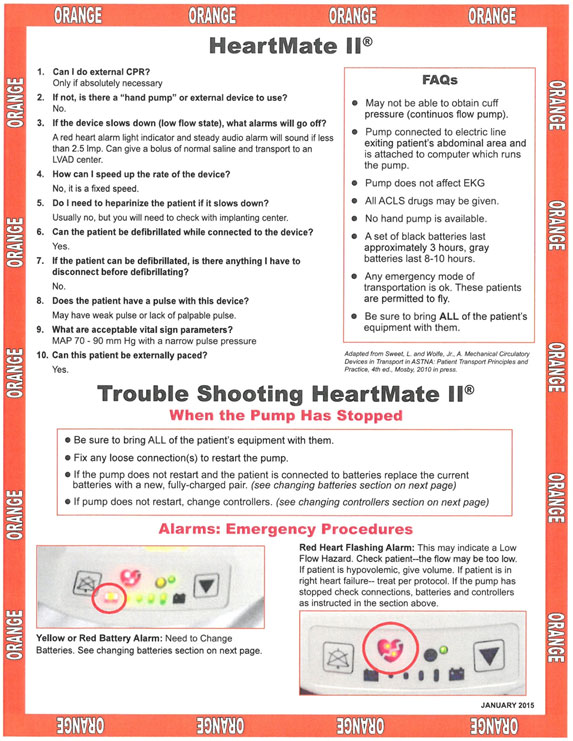
HeartMate II
- FAQs and Troubleshooting - When the Pump Has Stopped and Alarms: Emergency Procedures for HeartMate II
- Troubleshooting - Changing Batteries and Controllers for HeartMate II
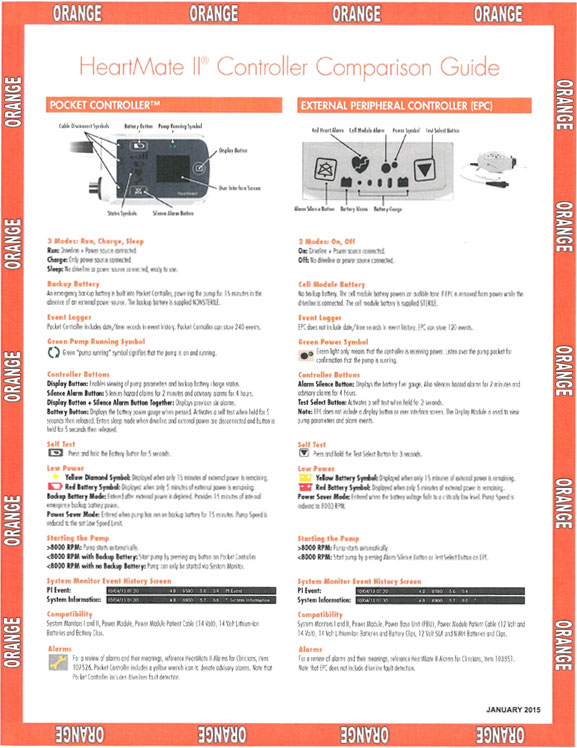
- Controllers Comparison Guide page 1 - Controllers
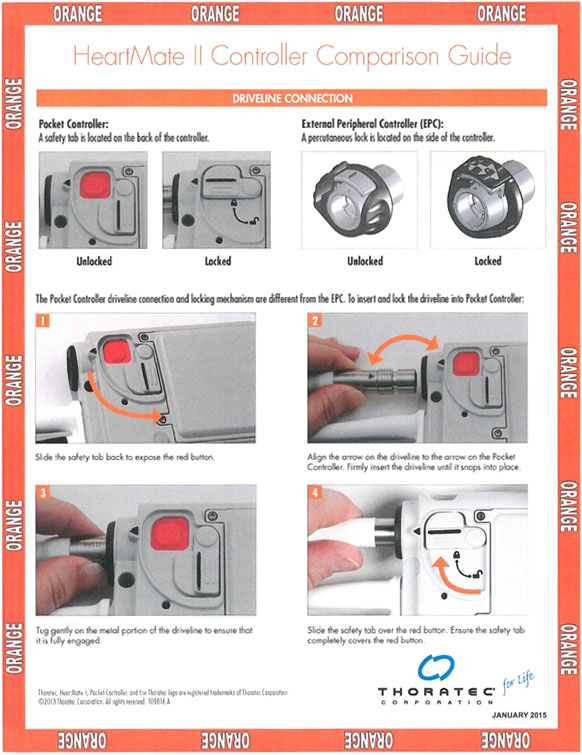
- Controllers Comparison Guide page 2 - Driveline Connection
HeartWare
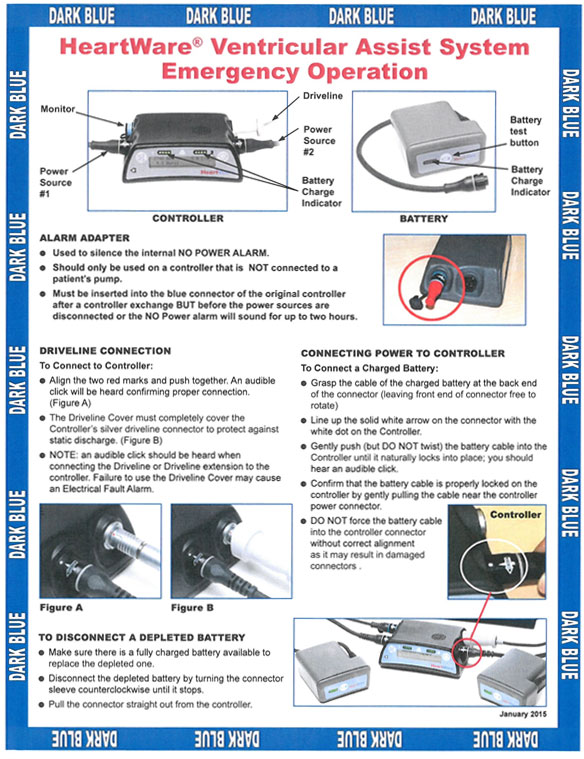
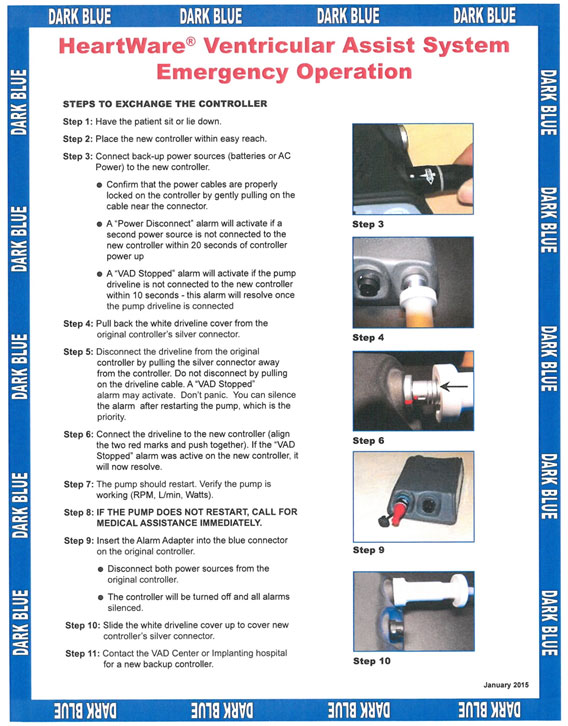
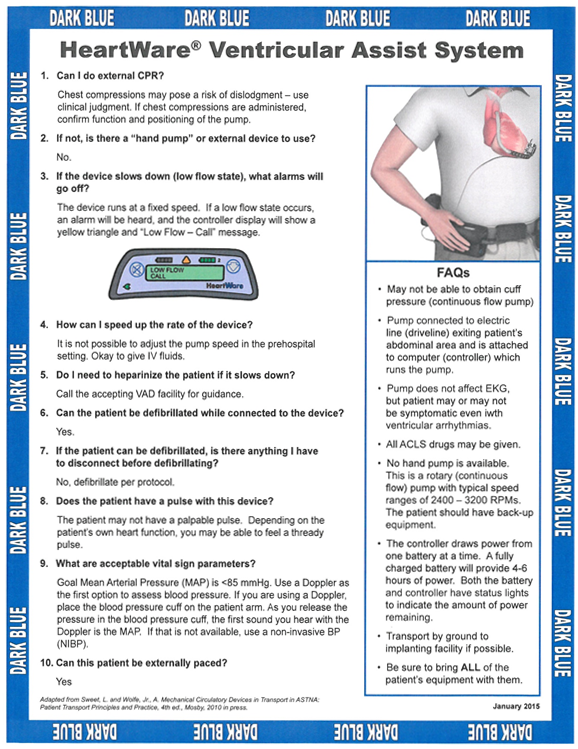
- HeartWare Ventricular Assist System Emergency Operation page 1
- HeartWare Ventricular Assist System Emergency Operation page 2
- FAQs for HeartWare
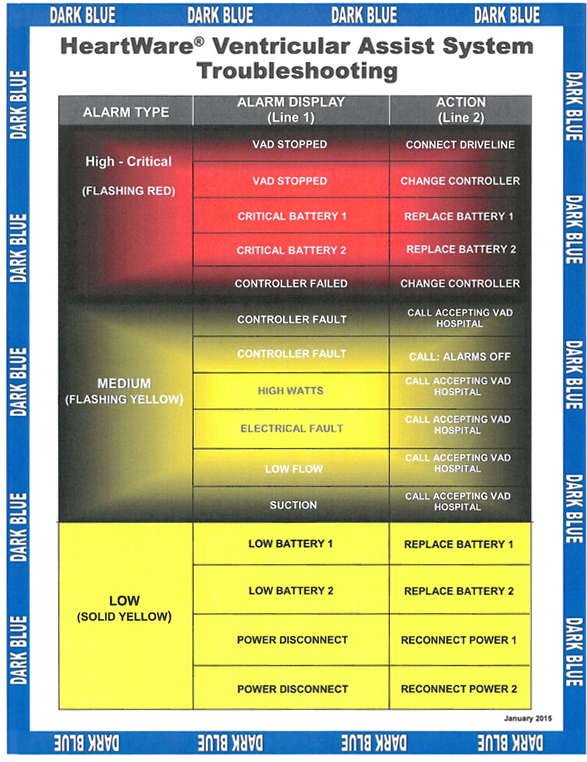
- Troubleshooting for HeartWare
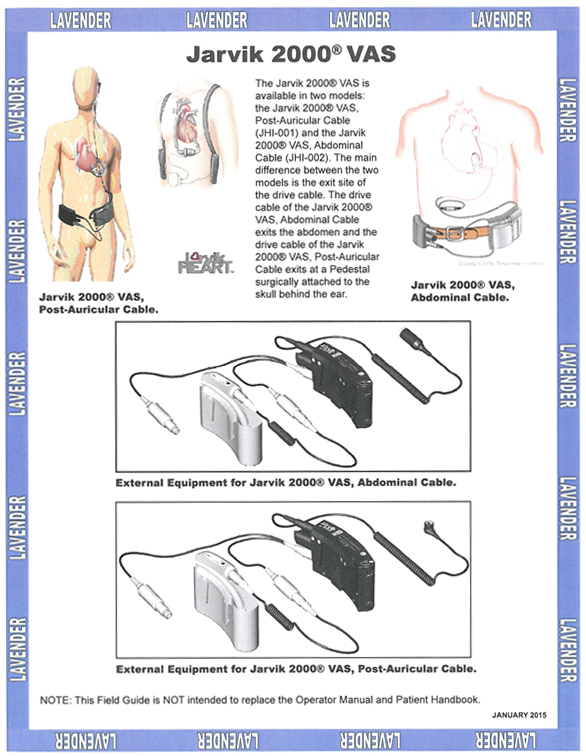
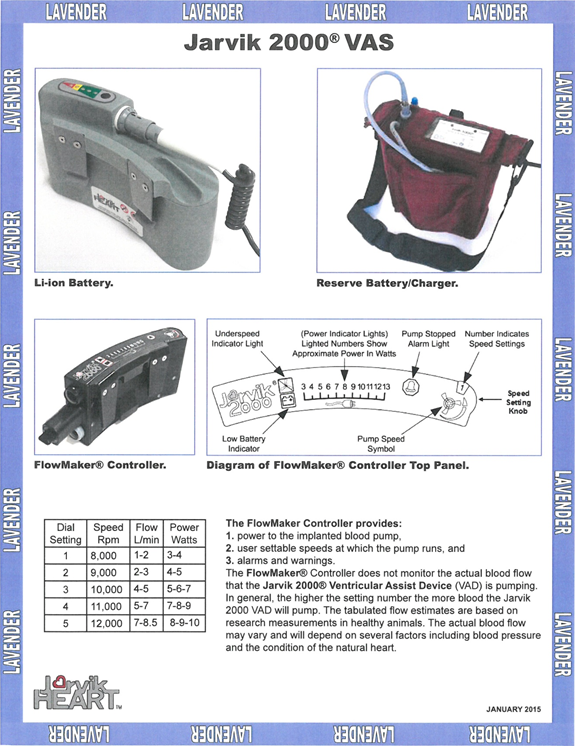
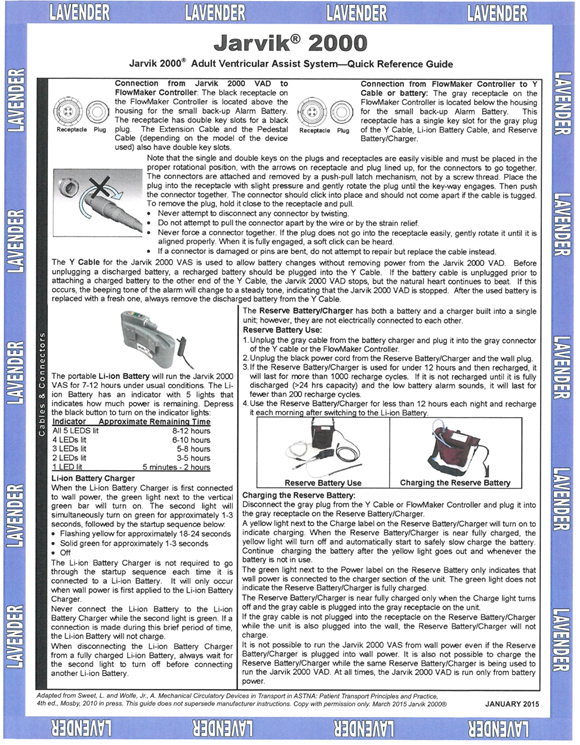
Jarvik 2000
- FAQs for Jarvik 2000
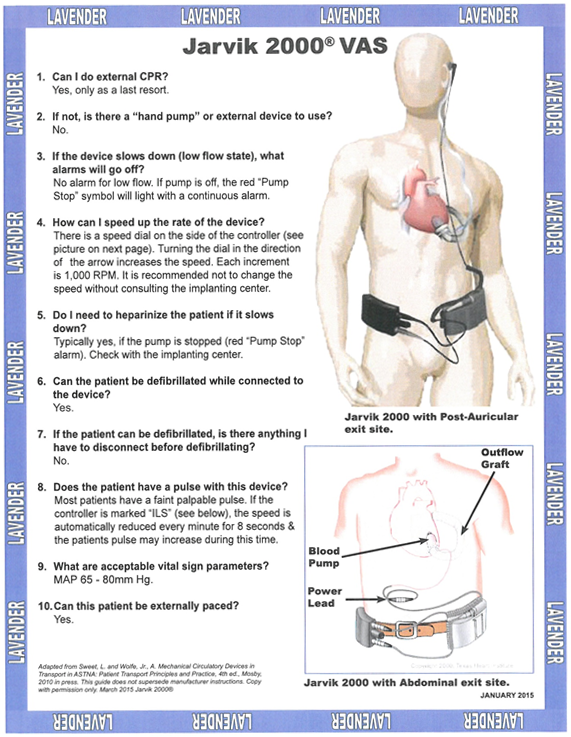
- Overview page 1
- Overview page 2
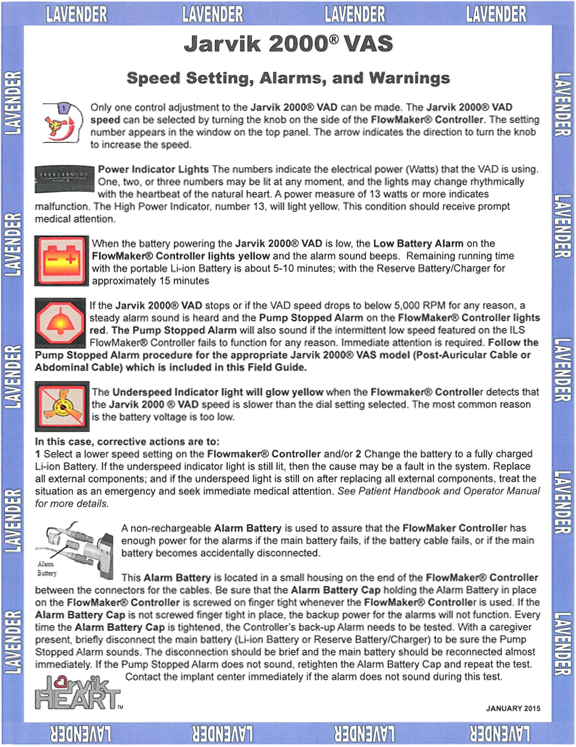
- Speed Setting, Alarms, and Warnings
- Procedure to Resolve Pump Stopped Alarm, Post-Auricular Cable
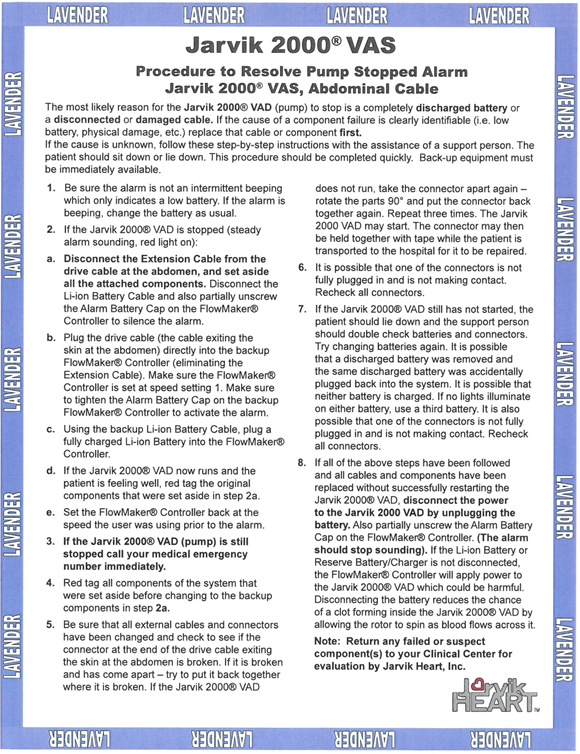
- Procedure to Resolve Pump Stopped Alarm, Abdominal Cable
- Quick Reference Guide
Thoratec PVAD
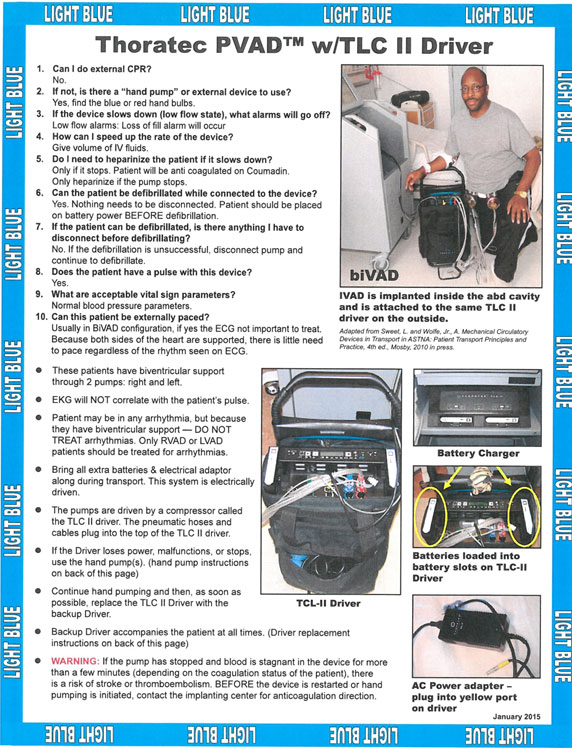
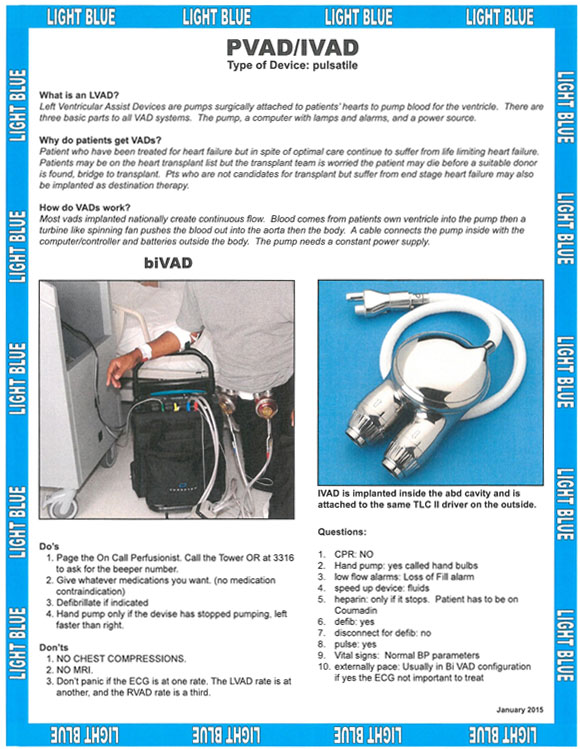
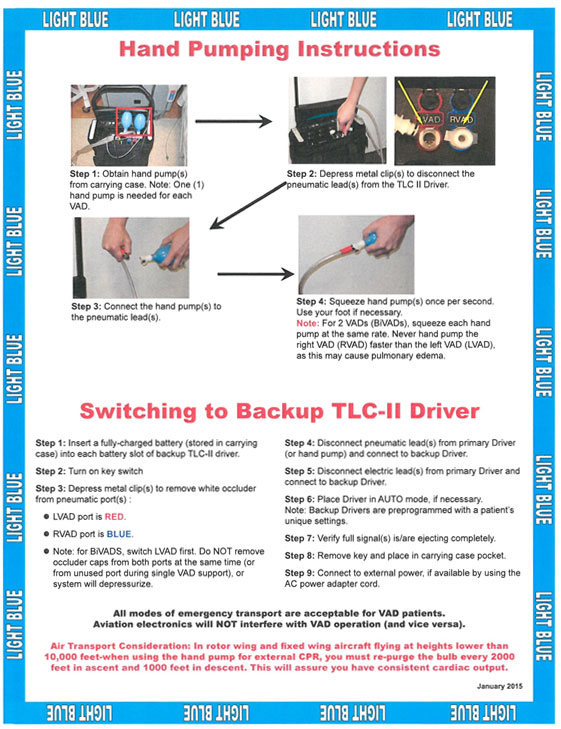
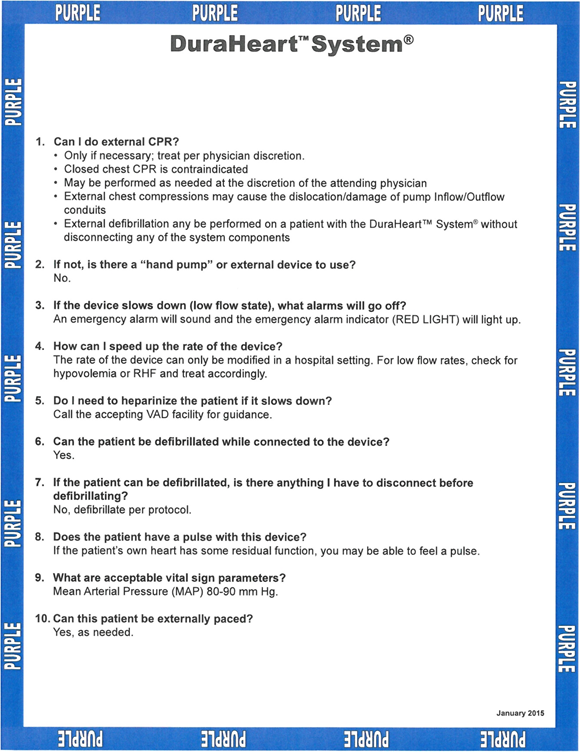
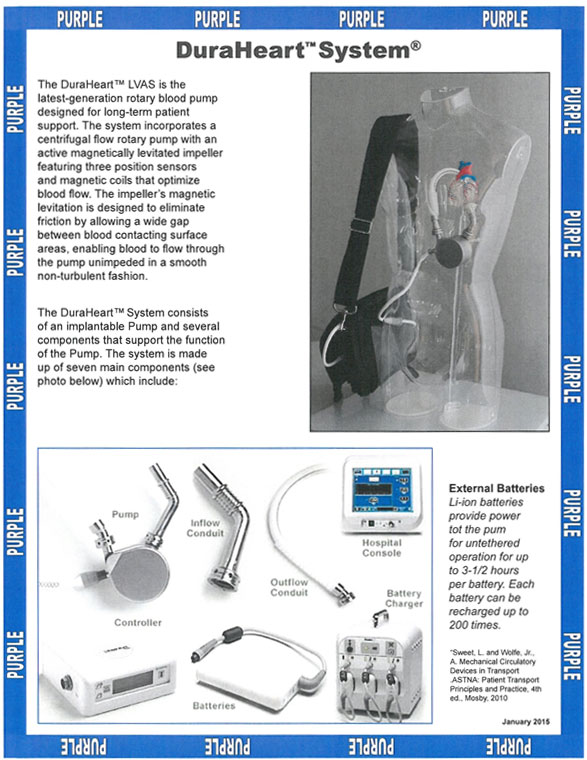
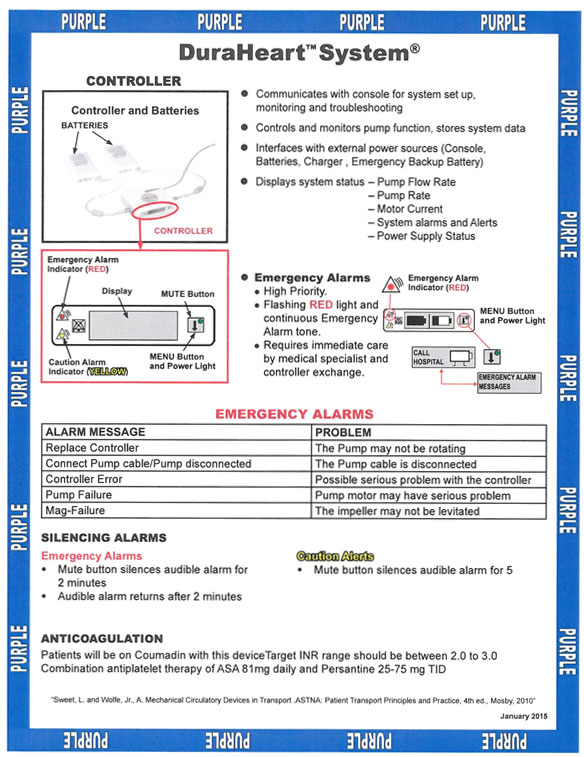
DuraHeart
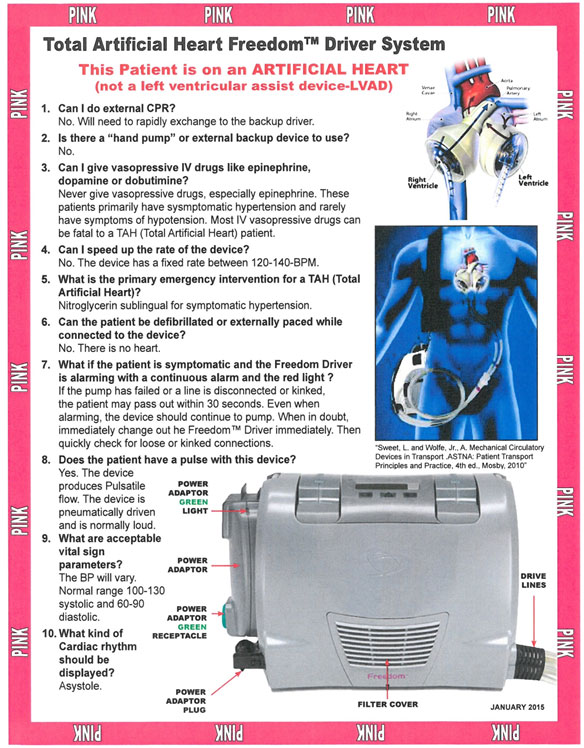
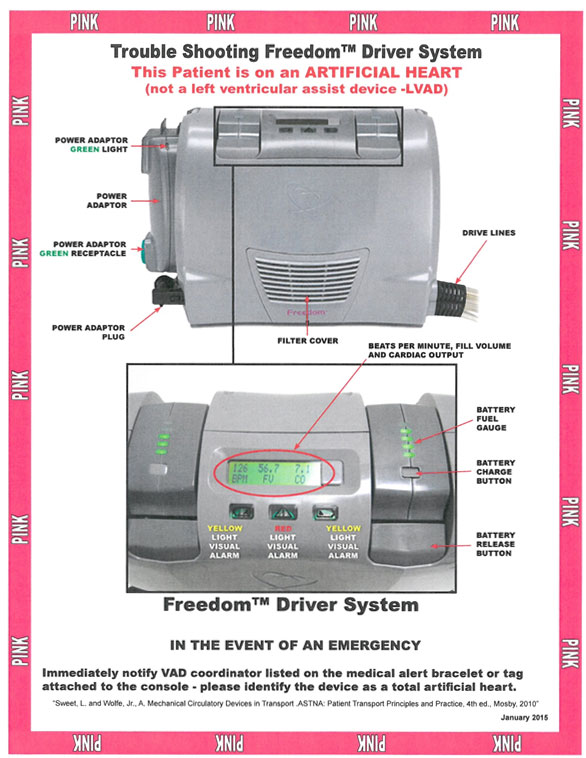
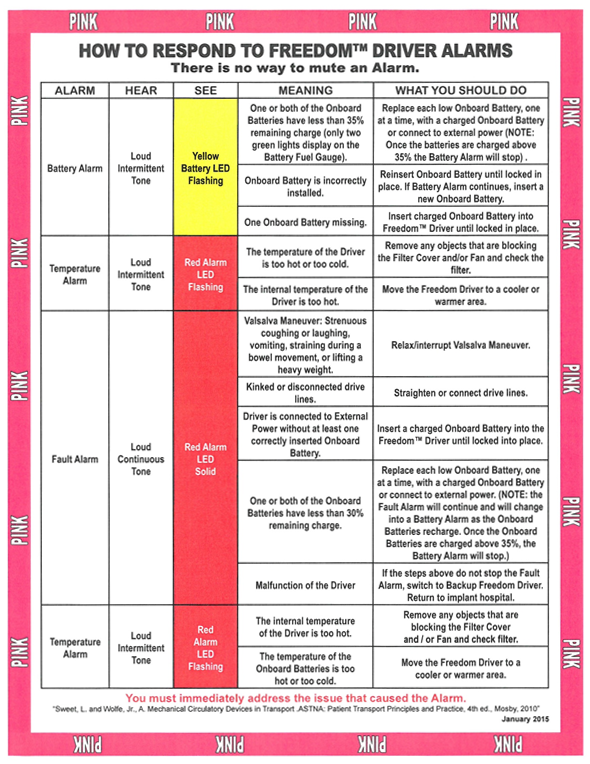
Patient Management For TAHs
- Assess the patient’s airway and intervene per your protocol.
- Auscultate heart sounds but you can usually hear them without a stethoscope. Since this is pulsatile you should hear two sounds if properly functioning.
- Assess the device for any alarms.
- Look on controller usually found around the waist of the patient and to see what color tag and device it is. The backpack or freedom driver should have a pink tag on it. It will have the type of device this is and contact information to the implantation center.
- Match the color on the device tag to the EMS Guide. The tag on the backpack or freedom driver’s colored tag should match the ems guide. This will tell you how to manage any alarms.
- Intervene appropriately based on the type of alarm, tag (device) and EMS Guide.
- Start Large Bore IV.
- Assess Vital Signs. REMEMBER THERE IS NO EKG. THE PATIENT IS ASYSTOLIC.
- YOU SHOULD BE ABLE TO GET A SYSTOLIC AND DIASTOLIC BLOOD PRESSURE.
- Transport to the closest center that can care for a TAH. Look on the PINK tag to find out this information.
- Bring all of the patients’ equipment.
- Bring the significant other if possible to act as an expert on the device if the patient is unconscious.